Mini Charcuterie Boxes: An Amazing Ultimate Guide (10 Tips)
Mini charcuterie boxes are delightful little packages that can elevate any gathering, from casual get-togethers to special celebrations. With their perfect blend of savory meats, artisanal cheeses, and colorful accompaniments, these small boards offer a visual feast that will leave your guests impressed. Assembling mini charcuterie boxes is not only fun but also incredibly satisfying, making each box a unique creation that reflects your taste and style.
The beauty of mini charcuterie boxes lies in their versatility. Whether you’re catering to meat lovers, vegetarians, or those with a sweet tooth, these boxes can be tailored to suit all preferences. Imagine creating a delectable assortment filled with gourmet cheeses, cured meats, fruits, nuts, and spreads. Each bite is a burst of flavor, making these mini boxes a fantastic choice for parties, picnics, or even a cozy movie night at home.
In this ultimate guide, we will explore everything you need to know about mini charcuterie boxes. From the essential ingredients to the art of presentation, this guide will inspire you to create amazing mini charcuterie boxes that will wow your guests. Let’s dive into the delectable world of mini charcuterie!
Why You’ll Love This Recipe
Mini charcuterie boxes offer a range of benefits that will make you eager to create your own. Here are some reasons why you’ll love making these delightful arrangements:
1. Customization – Each box allows you to tailor the ingredients to meet your guests’ preferences or dietary restrictions. Feel free to mix and match flavors and textures!
2. Easy Preparation – Assembling mini charcuterie boxes is straightforward, not requiring any cooking. Simply arrange the ingredients artfully.
3. Visual Appeal – The vibrant colors and varied shapes create a stunning visual display that draws people in. A well-arranged box is more than just food; it’s a work of art.
4. Sharing Friendly – These boxes are great for sharing, making them perfect for parties and gatherings. They inspire a communal atmosphere as guests discuss their favorite nibbles.
5. Portability – Mini charcuterie boxes are easy to transport, making them ideal for picnics, road trips, or any occasion where food needs to travel.
6. Good for Any Occasion – Whether it’s a birthday party, holiday celebration, or an afternoon snack, mini charcuterie boxes are a wonderful addition to any event.
7. Variety of Flavors – With an endless combination of ingredients, you can explore different flavor profiles based on seasonal or regional items, which keeps your offerings fresh and exciting.
8. Conversation Starter – The assortment of flavors often leads to discussions about favorite pairings, making your gathering more interactive.
9. Healthier Snacking – You can include a range of healthy options like fresh fruits and nuts, creating a delicious yet nutritious snacking experience.
10. A Unique Experience – Offering mini charcuterie boxes gives your guests an immersive experience rather than a simple meal.
With these points in mind, you’ll see why mini charcuterie boxes are a perfect choice for any gathering. Each bite can bring joy and inspiration, making food a central element of your celebration!
Preparation and Cooking Time
Creating mini charcuterie boxes is a quick and enjoyable task. Here’s an estimated timeline to help plan your prep:
– Preparation Time: 15-20 minutes
– Assembly Time: 10-15 minutes
– Total Time: Approximately 30-35 minutes
With minimal time invested, you can prepare stunning charcuterie boxes that delight and impress!
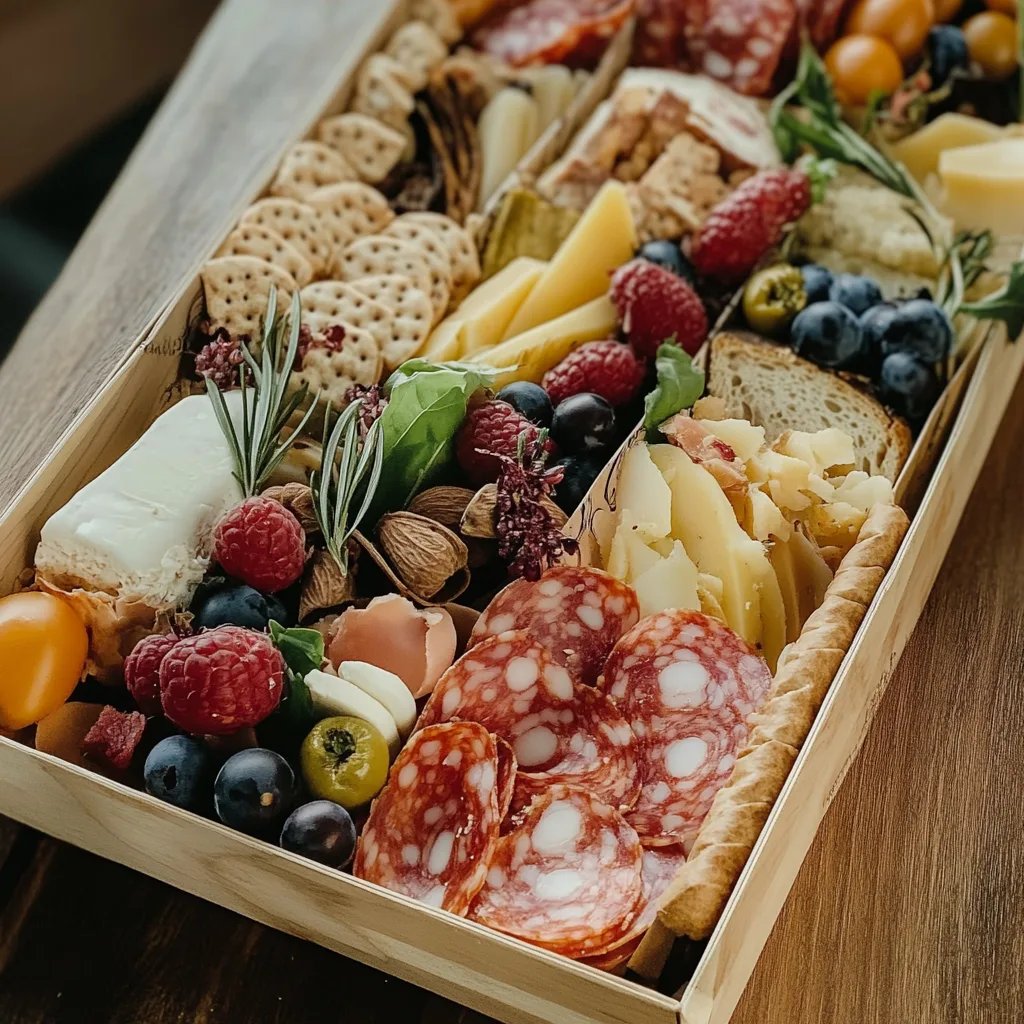
Ingredients
– Cured meats (e.g., prosciutto, salami, or chorizo)
– Variety of cheeses (e.g., brie, cheddar, goat cheese)
– Fresh fruits (e.g., grapes, strawberries, apple slices)
– Dried fruits (e.g., apricots, figs, cranberries)
– Mixed nuts (e.g., almonds, walnuts, pecans)
– Crackers (e.g., water crackers, breadsticks)
– Spreads (e.g., hummus, mustard, or chutney)
– Fresh herbs (e.g., rosemary, thyme, or basil)
– Olives or pickles
– Chocolate or sweet treats (optional)
Step-by-Step Instructions
Creating stunning mini charcuterie boxes involves a few straightforward steps:
1. Gather Your Ingredients: Collect all your selected ingredients and prepare them for assembly.
2. Choose Your Base: Select a small box, tray, or plate as your presentation vessel. Consider using wooden boards or small baskets for a rustic touch.
3. Start with Cheeses: Place your cheese selections in strategic spots throughout the box. Cut cheeses into blocks, wedges, or slices for variety.
4. Add Cured Meats: Curl or fold cured meats into the box, creating visual interest. Arrange them near the cheese for easy pairing.
5. Incorporate Fresh and Dried Fruits: Fill gaps with fresh berries or sliced fruits. Mix in dried fruits for sweetness and textural contrast.
6. Fill in with Nuts: Scatter mixed nuts around the box to add crunch and additional flavor.
7. Add Crackers: Position crackers or breadsticks upright or neatly placed for easy access.
8. Incorporate Spreads: Create small dollops of spreads in the box or use individual containers if preferred.
9. Use Fresh Herbs: Place fresh herbs strategically for garnish, enhancing the aesthetic and aroma of your box.
10. Add Final Touches: Include olives, pickles, or chocolate pieces to round out the flavors. Ensure all elements are easily reachable and inviting.
By following these steps, you’ll produce beautifully arranged mini charcuterie boxes that not only look wonderful but also taste incredible!
How to Serve
Serving mini charcuterie boxes requires a few considerations to maximize your presentation and experience:
1. Presentation: Place your charcuterie boxes on a prominent table, allowing guests to serve themselves easily. A colorful display enhances the overall aesthetic.
2. Utensils: Ensure clean toothpicks, small forks, or serving utensils are available for easy and hygienic sharing.
3. Pairing: Consider accompanying beverages like wine, craft beer, or refreshing mocktails to complement the flavors of the charcuterie.
4. Encourage Pairings: Invite guests to experiment with different combinations of meat, cheese, and spreads. This interactive element engages everyone and makes them feel included.
5. Keep It Cool: If your event lasts for several hours, especially outdoors, be mindful of keeping the charcuterie fresh. Use ice packs under serving trays if necessary.
By focusing on these serving tips, you’ll create an enjoyable and memorable experience for your guests, showcasing the best of what mini charcuterie boxes have to offer!
Additional Tips
– Use Fresh Ingredients: Fresh fruits and nuts enhance the flavor and appearance of your mini charcuterie boxes. Avoid items that appear wilted or stale.
– Balance the Flavors: Aim for a mix of sweet, savory, crunchy, and soft elements. This balance will make each bite interesting.
– Experiment with Themes: Consider themed charcuterie boxes, such as Italian with antipasto items or a Mediterranean box with olives and feta.
– Incorporate Local Fare: Support local producers by incorporating regional meats, cheeses, and spreads into your boxes for a unique touch.
Recipe Variation
Feel free to get creative! Here are a few variations for your mini charcuterie boxes:
1. Mediterranean Delight: Replace cured meats with hummus, olives, feta cheese, and pita chips for a flavorful Mediterranean twist.
2. Breakfast Box: Include items like mini bagels, cream cheese, smoked salmon, and fresh fruit for a delightful breakfast option.
3. Sweet Treat Box: Focus on dessert items with chocolates, cookies, fruits, and a selection of flavored cream cheeses for a sweet experience.
Freezing and Storage
– Storage: Keep mini charcuterie boxes in an airtight container in the refrigerator. They are best consumed within 24 hours for optimal freshness.
– Freezing: It’s not recommended to freeze assembled charcuterie boxes, as ingredients like fruits and cheeses do not thaw well. Instead, you can prepare individual components in advance and assemble before serving.
Special Equipment
To create the best mini charcuterie boxes, you’ll need a few basic items:
– Cutting Board: For slicing cheeses and meats.
– Serving Plates or Boxes: Small trays or containers to present your charcuterie.
– Knife: A cheese knife is useful for slicing harder cheeses.
– Utensils: Small tongs or toothpicks for serving.
– Containers: For spreads or dips, use small individual containers to keep things neat.
Frequently Asked Questions
What types of meats work best?
Cured meats such as salami, prosciutto, and chorizo are popular. Choose a mix for flavor diversity.
Can I make these boxes in advance?
Yes, but keep fruits and cheeses separate until just before serving to maintain freshness.
What if I have vegan guests?
You can easily create a vegan charcuterie box with plant-based cheeses, hummus, vegetables, and fruits.
Is it okay to include leftovers?
Yes, leftover cheeses and meats can be used, but be cautious about freshness and flavor compatibility.
How do I prevent items from drying out?
Cover the boxes with plastic wrap or keep tightly sealed until serving to minimize exposure to air.
Conclusion
Mini charcuterie boxes are not just a feast for the eyes; they provide a delightful way to bring friends and family together over good food. By incorporating a variety of flavors, textures, and colors, you create an interactive and enjoyable experience for everyone involved. Whether for casual parties or more formal gatherings, mini charcuterie boxes are a delightful addition that can be tailored to suit any occasion. With this guide, you’re well-equipped to craft your own delicious, personalized charcuterie boxes that will leave a lasting impression.