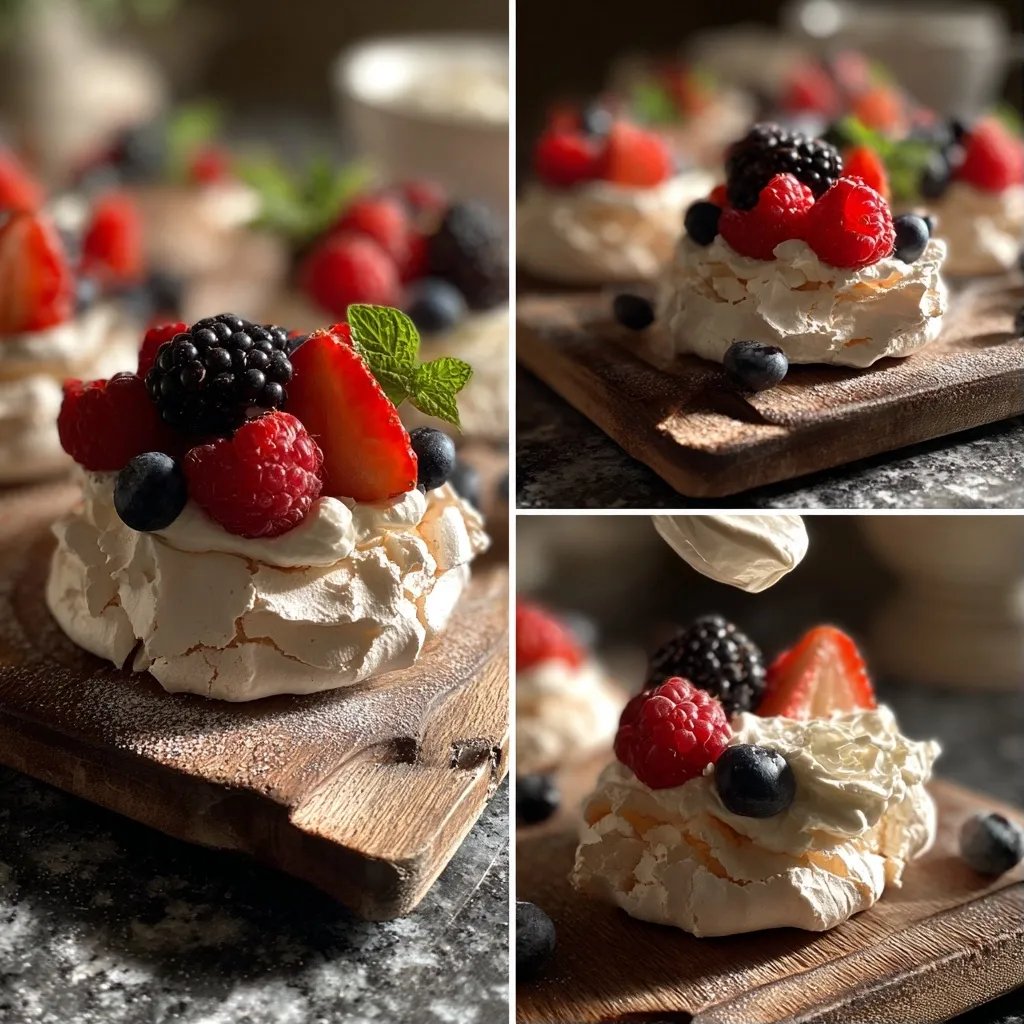
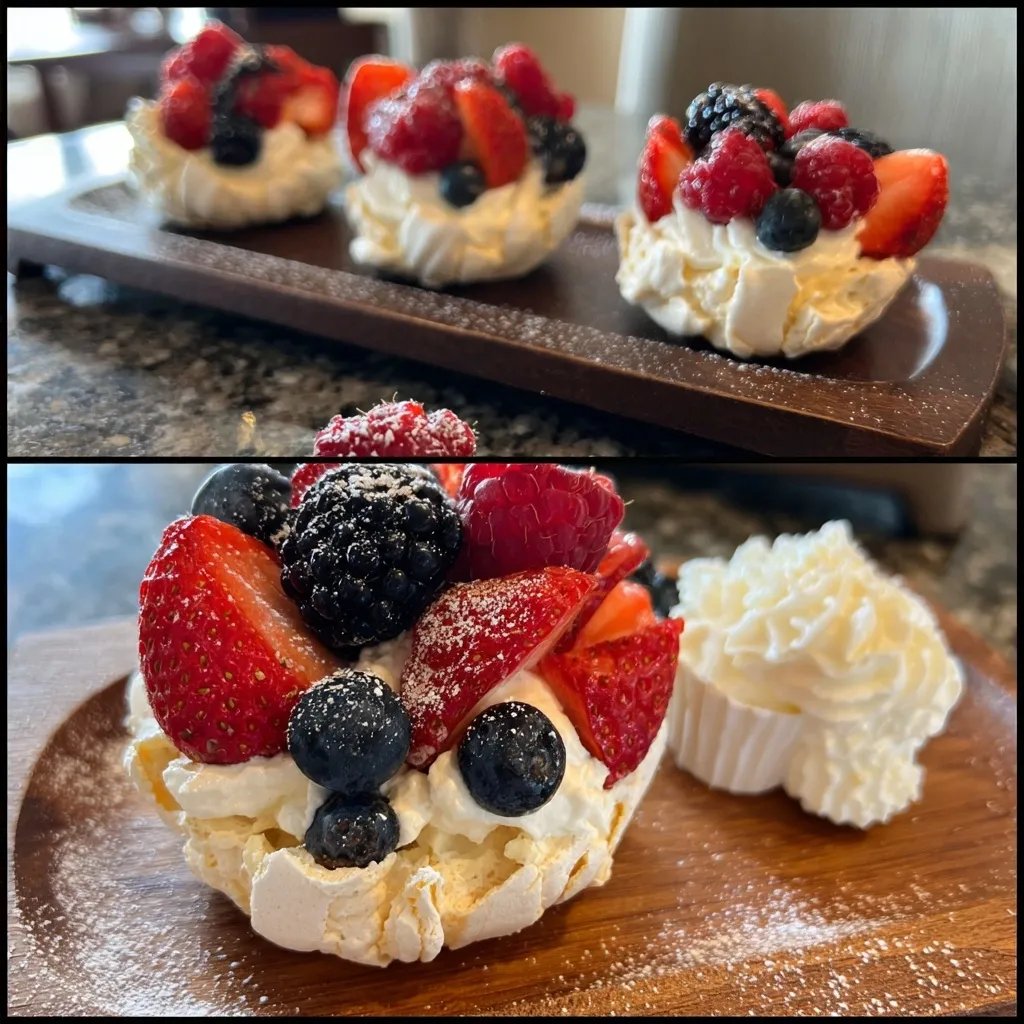
Mini Pavlova Nests
Highlighted under: Indulgent Baking Ideas
For something this simple, it has no right being this good. All you really need are a few egg whites and some sugar, but somehow what comes out of the oven feels like a fancy dessert. These little cloud-like meringues have a wonderful crisp outside and a soft, chewy inside, making them the perfect vessel for any toppings. I never get tired of experimenting with different fruits or creams, and hey, with such a light dessert, you don’t have to feel too guilty about seconds!
I'll admit, I was a bit intimidated the first time I tried making meringue. It felt like one of those things that only pastry chefs could accomplish. But honestly, with just a little patience and a good mixer, it turned out to be super easy. I remember waiting nervously by the oven as the little nests bubbled and cracked. Once I pulled them out, I knew I had created something special.
What I love most is how versatile they are. You can pile them high with whipped cream, fresh berries, or even a drizzle of chocolate. I’ve tried it all! To be fair, the last time I made these, I accidentally set the oven too high and they cracked more than usual, but hey, that just added character, right?
Why I Keep Making This
- They're impressively easy for how elegant they look
- You can use whatever fresh fruit you have on hand
- Great way to use up leftover egg whites from other baking
Choosing Your Ingredients
When you're making these mini pavlova nests, the quality of your egg whites really matters. Fresh eggs tend to whip up better, forming those lovely soft peaks that are the foundation of this dessert. Try to separate the whites from the yolks without any doubt; even a speck of yolk can be a headache when you're whipping your egg whites.
As for the sugar, granulated is the norm here, but if you want to experiment a little, you can use superfine sugar. It dissolves more easily and helps achieve an even finer texture. The vinegar and cornstarch might seem minor, but they contribute to the meringue's structure and stability, so don’t skip them.
A Quick Note on Mini Pavlova Nests
I find that the baking time can really depend on your oven, so do keep an eye on them toward the end. Ovens can be sneaky; they sometimes run hotter or colder than the dial suggests. You want those pavlovas to feel dry to the touch and not wiggle when you give them a gentle poke. If you find they’re cracking too much, it might just be the humidity in your kitchen – that can mess with meringue consistency.
While these mini nests look fancy, they’re actually quite forgiving. If one doesn’t rise as high or has a little crack, it’s no big deal. They’ll still taste great! Just fill it up with whipped cream and fruit, and nobody will notice. And when I’m in a rush, I’ve even skipped piping them and just spooned the meringue onto the baking sheet in rough shapes—it works just fine!
Ingredients
Here’s what you’ll need:
For the Pavlova
- 4 large egg whites
- 1 cup granulated sugar
- 1 teaspoon white vinegar
- 1 teaspoon cornstarch
- 1/2 teaspoon vanilla extract
For Topping
- 1 cup heavy cream
- 2 tablespoons powdered sugar
- Assorted fresh fruits (strawberries, kiwi, blueberries, etc.)
Instructions
Let's get started on these delightful nests:
Preheat Oven
Start by preheating your oven to 250°F (120°C). Line a baking sheet with parchment paper and draw 8 circles on it with a pencil so you know where to pipe your meringue.
Beat the Egg Whites
In a clean mixing bowl, whisk the egg whites on medium speed until they form soft peaks, which usually takes about 3-5 minutes. If you haven't cleaned your bowl well, the egg whites might not beat up properly, so make sure it's spotless.
Add Sugar Gradually
Once you have those soft peaks, start adding your sugar a little at a time, letting it incorporate well after each addition. This is where you want to be patient. If it dissolves too quickly, the texture won’t be right.
Incorporate Vinegar and Cornstarch
After all the sugar is mixed in, add the vinegar, cornstarch, and vanilla extract. Gently fold these in with a spatula. It’s okay if it feels a bit lumpy; that’s normal.
Pipe the Nests
Spoon the meringue mixture into a piping bag fitted with a round tip. Pipe the meringue onto your circles from earlier, making a small swirl for the nest shape. Aim for about 2 inches in diameter, but don’t stress if they’re not perfect!
Bake
Place the baking sheet in the oven and bake for about 75-90 minutes. You want them to be dry all the way through. I usually check around the 75-minute mark; they should easily peel off the parchment without sticking.
Cool and Top
Once baked, turn off the oven and let the meringues cool inside with the door slightly ajar for about 30 minutes. In the meantime, whip the heavy cream with powdered sugar until soft peaks form. After they are completely cooled, top each meringue with whipped cream and your favorite fruits.
Pro Tips
- Don't whisk the egg whites in a plastic bowl, use metal or glass instead.
- You can keep baked meringues in an airtight container for a few days, but they’re best eaten fresh.
- If you're worried about cracking, try adding a little more cornstarch to your mixture.
How to Store Mini Pavlova Nests
Once you've made your pavlova nests, storing them can be a bit tricky. It’s best to keep them in an airtight container at room temperature, but make sure they don’t sit too long – they taste their best fresh. If you have leftover meringues, they should last a couple of days, but they'll start to lose their crispness over time. Honestly, if you're planning to serve them later, wait to fill them with cream and fruit until just before you dig in.
If you’re making them ahead of time, you can whip the cream a day ahead, though freshly whipped cream always tastes better. Store the whipped cream in the fridge in a covered container, and just give it a quick re-whip if it starts to lose its fluff.
Ways to Switch It Up
While strawberries and kiwi are classic favorites, don’t hesitate to try other fruits. Raspberries, mangoes, or even poached pears are delicious alternatives. You could also play with different flavored creams—try adding a bit of lemon zest to your whipped cream for a refreshing twist. I’ve even stirred in some cocoa powder for a chocolatey version, which is surprisingly good!
And if you happen to have some chocolate sauce or caramel around, drizzle a little on top before adding the fruit. Just keep in mind that too much sauce can get messy, and you might want to keep it light. It's all about your personal taste, so have fun experimenting with whatever you have in your kitchen!
Mini Pavlova Nests
Created by: The Meals By Sophia Team
Recipe Type: Indulgent Baking Ideas
Skill Level: Beginner
Final Quantity: 8.0
What You'll Need
For the Pavlova
- 4 large egg whites
- 1 cup granulated sugar
- 1 teaspoon white vinegar
- 1 teaspoon cornstarch
- 1/2 teaspoon vanilla extract
For Topping
- 1 cup heavy cream
- 2 tablespoons powdered sugar
- Assorted fresh fruits (strawberries, kiwi, blueberries, etc.)
How-To Steps
Start by preheating your oven to 250°F (120°C). Line a baking sheet with parchment paper and draw 8 circles on it with a pencil so you know where to pipe your meringue.
In a clean mixing bowl, whisk the egg whites on medium speed until they form soft peaks, which usually takes about 3-5 minutes. If you haven't cleaned your bowl well, the egg whites might not beat up properly, so make sure it's spotless.
Once you have those soft peaks, start adding your sugar a little at a time, letting it incorporate well after each addition. This is where you want to be patient. If it dissolves too quickly, the texture won’t be right.
After all the sugar is mixed in, add the vinegar, cornstarch, and vanilla extract. Gently fold these in with a spatula. It’s okay if it feels a bit lumpy; that’s normal.
Spoon the meringue mixture into a piping bag fitted with a round tip. Pipe the meringue onto your circles from earlier, making a small swirl for the nest shape. Aim for about 2 inches in diameter, but don’t stress if they’re not perfect!
Place the baking sheet in the oven and bake for about 75-90 minutes. You want them to be dry all the way through. I usually check around the 75-minute mark; they should easily peel off the parchment without sticking.
Once baked, turn off the oven and let the meringues cool inside with the door slightly ajar for about 30 minutes. In the meantime, whip the heavy cream with powdered sugar until soft peaks form. After they are completely cooled, top each meringue with whipped cream and your favorite fruits.
Extra Tips
- Don't whisk the egg whites in a plastic bowl, use metal or glass instead.
- You can keep baked meringues in an airtight container for a few days, but they’re best eaten fresh.
- If you're worried about cracking, try adding a little more cornstarch to your mixture.
Nutritional Breakdown (Per Serving)
- Calories (kcal): 118
- Total Fat (g): 7.5
- Saturated Fat (g): 4.5
- Cholesterol (mg): 48
- Sodium (mg): 22
- Total Carbohydrates (g): 10.7
- Dietary Fiber (g): 0.5
- Sugars (g): 9.3
- Protein (g): 1.5